31 July 2017

CRAFT CONTRADICTIONS AND THE KELMSCOTT PRESS


In every generation craftspeople discover that they can't make a living making things by hand. William Morris was unusual in running a successful business, but C.R.Ashbee, after heroic efforts to set up a craft community in the Cotswolds, eventually gave up in the early years of the 20th century, undermined by competition from machine made goods on one side and on the other by the amateurs who undercut him, and William de Morgan had to close his pottery after years of experimentation that had brought him technical and artistic success but financial failure. De Morgan made a decent living afterwards as a novelist. He may not have been very businesslike in his pottery, self-deprecatingly describing himself as not organised but "demorganised". Bernard Leach survived for many years with the assistance of patrons and then with the help of book royalties, and more than once expressed the view that the craftsman should receive some sort of public subsidy. Teaching, of course, has always been a mainstay.

In the early days, the days of Morris and the Arts and Crafts Movement, the artistic crafts expressed an upper-class prejudice against trade but also a popular reaction against machinery and the factory system, the ugliness of mass produced goods and dreadful working conditions. It was honestly believed that Britain could get back to an imagined existence of hand-crafted manufacture. Only since the 1970s have craft makers and public agencies  frankly recognised the crafts as an artistic activity producing luxuries rather than everyday goods. The transition was marked by the transfer of government responsibility for crafts from the Board of Trade to the Department of Education (now Department for Digital, Culture Media and Sport).


Graham Wallas, the Fabian Society co-founder of the London School of Economics, poured cold water on Morris's utopia. In his book The Great Society, he said:
"Once, while I listened to him lecturing, I made a rough calculation that the citizens of his commonwealth, in order to produce by the methods he advocated the quantity of beautiful and delicious things which they were to enjoy, would have to work about two hundred hours a week. It was only the same fact looked at from another point of view which made it impossible for any of Morris's workmen, or indeed for anyone at all whose income was near the present English average, to buy the products either of Morris's workshop at Merton or of his Kelmscott Press."

Thorstein Veblen, although an admirer of Morris, described the Kelmscott Press from an economic point of view as "ridiculous". Noting that printers were returning to “'old-style', and other more or less obsolete styles of type which are less legible and give a cruder appearance to the page than the 'modern',” he wrote of Morris's books that -
"Here we have a somewhat cruder type, printed on hand-laid, deckeledged paper, with excessive margins and uncut leaves, with bindings of a painstaking crudeness and elaborate ineptitude. The Kelmscott Press reduced the matter to an absurdity — as seen from the point of view of brute serviceability alone — by issuing books for modern use, edited with the obsolete spelling, printed in black-letter, and bound in limp vellum fitted with thongs. As a further characteristic feature which fixes the economic place of artistic book-making, there is the fact that these more elegant books are, at their best, printed in limited editions. A limited edition is in effect a guarantee — somewhat crude, it is true — that this book is scarce and that it therefore is costly and lends pecuniary distinction to its consumer."

23 July 2017

HATFIELD ART IN CLAY 2017

19 July 2017

THE RIGHT METHOD FOR POTTERY MAKING


My recent posts were about putting handles on cups and turning bowls, each of which made use of the appropriate technology. I went on to cups and saucers, which were thrown on the wheel and then turned, and as I was making them I started to wonder if was using the correct method.

Throwing gets to potters: they enjoy it, for many of them it was the fascination of throwing that drew them into pottery in the first place, and however much they do it there will always be the challenge of doing it better. I make on the wheel partly because it is quick, partly because I like it, but partly because a sort of inertia prevents me from investing time and money in a different way of working. Slip casting, even though I know the rudiments, would entail a steep learning curve and because it has its own aesthetic it would call for a revision of my range.

But what about saucers? They are troublesome. A small plate is thrown on a batt and left to stiffen overnight; then a well for the cup is cut into the surface, the saucer is wired off the bat, turned over, placed in a chuck and the foot-ring is cut into the base. The clay has to be soft enough to cut cleanly; too dry and it cannot be done well or fast enough. But a thin saucer - which is what I want, not a great thick lump - distorts when it's finished and lifted off the chuck.

The appropriate technology for this type of thing is a jigger and jolly machine, shown in use in the video above. Alas, this lovely piece of kit is impractical for me: no room and an outlay of several thousand pounds. Patience and perseverance will have to do for now.


14 July 2017

HOW TO TURN A FOOT-RING ON A BOWL


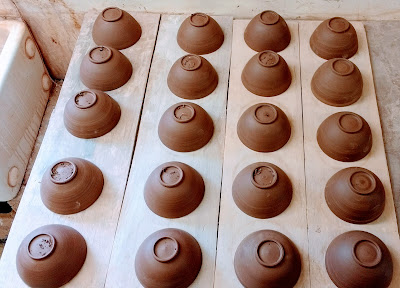
The condition of the clay has to be just right for turning, not too wet and not too dry. I am waiting for these little bowls to harden off so I am writing about it before I do it. The usual description of the correct clay condition is "leather hard", which doesn't communicate much. "Cheese hard" is also used, but what sort of cheese? A sort of old, mature cheddar, I'd say. The clay must not flake or crumble when it's cut with the turning tool, and it must not stick.

So what exactly is "turning"?  A shape is made by throwing soft clay on the wheel, but you can't shape the bottom like that. You have to let it harden, turn it over, spin the wheel and trim it with the sort of tools you see in the top right of the picture above. In the process, a narrow foot-ring is cut into the base, which allows the item to stand on a flat surface without wobbling and also allows a narrow band of glaze to be rubbed off before placing in the kiln so that the pot doesn't stick to the kiln shelf when the glaze melts. Otherwise, the base has to be supported on pointed stilts in the kiln. I only turn bowls and plates, though some potters turn tall shapes like mugs and vases. I suppose I should, but I'm rather lazy and it's not absolutely necessary.

For this purpose studio potter turn the pot upside down on the wheel, though the pottery industry, when it still shapes pots this way, uses a horizontal lathe. When throwing was the common method of making in the industry, the thrower was only concerned with shaping the inside of the pot, which he did with the aid of throwing ribs, and the outside was formed by the turner. William Morris and the early studio potters scorned turning of this sort, but that was one of their many irrational prejudices.

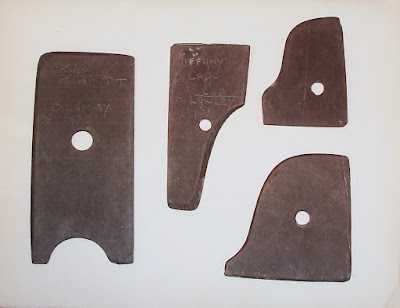
Here are some old potters' ribs made from slate, used by potters at Minton's in the 1930s.


I got them from an old potter who used to work for Minton's. The process is described in more detail in an earlier blog post here.

When you are turning a run of bowls the same size, you want to form a hump of clay on the wheel head that's the same shape as the inside so that each one can be popped on and off quickly. This is called a "chuck". The chuck doesn't want to stick to the inside of the bowl, so it mustn't be wet. If you want to use it straight away after throwing it, dry it with a blow torch. For a large single item, centre it on the wheel head and hold it in place with three dabs of soft clay.

Assess the thickness of the base by putting the bowl on a flat surface, placing a stick across the top and measuring the distance from rim to inside bottom and rim to surface and then subtract. The thickness to leave after turning should be roughly that of the wall of the bowl - mine are 5mm to 7mm depending on size. Look at the inside bottom and judge the width of the foot-ring according to practical and aesthetic criteria.

The procedure is to first cut the outside of the foot ring and shape down to the rim of the bowl, and only when that's done shape the inside of the foot ring. The bowl is spun rapidly and the turning tool is brought gently into contact with the surface to cut away excess clay. Have a file by your side and keep the tool sharp - clay will blunt it quickly. The height and shape of the foot-ring is a matter of aesthetic judgement (I don't like a high footring or one that splays out or turns in excessively) but the thickness should echo the thickness of the rim. It is common for beginners to cut a wide foot ring with a square section, which looks crude. The edge of the foot ring should either be chamfered on both edges or rounded off. A small delicate item can have a very small foot ring, as on this saucer that I made. The foot ring was glazed in this case, so the saucer was supported on stilts, whose marks are clearly seen.


POSTSCRIPT
Here they are all done.


12 July 2017

ATTACHING HANDLES TO MUGS

Attaching handles to mugs requires the right degree of hardness/softness in the clay, hard enough to manipulate without distortion, soft enough to get a good fix and to press gently into shape. My handles are extruded and attached with dabs of slip, so they can be fairly hard, so can the mugs. My rule is, "Slip for a hard fix, water for a soft fix." So, if you pull your handles on the mugs, you will need to attach your soft lug of clay with water.

Here the handles have been cut to length and bent immediately into shape and they're hardening off a bit. The weather has been warm and the mugs have got a bit too hard - I made them on Monday and had to go to a meeting yesterday and I wrapped them in polythene sheet, but they've dried out quickly. In extremis, you can speed up drying with a blowtorch or slow down with a mist of sprayed water.

The ends of the handles are shaped so that they fit straight away. The top of the handle is cut with the curved brass blade to fit the curve of the mug, angled slightly away from the top to get the right angle when fixed. The bottom is cut on the slant with the little straight-bladed knife. The handle is lens shaped in section, flat on the bottom and curved on the top, and it's important to cut the bottom with the flat side uppermost so that the angled cut is snug to the side of the mug.

It's all this preparation that takes time, attaching the handle takes a few seconds. The position on the mug is scored, top and bottom, two dabs of slip, the handle is taken up  between finger and thumb, the mug in the other hand, and then, plonk! On it goes. Check from all angles if it's straight, then clean up with a wet brush and then sponge off any irregularities on the rim, any crumbs of clay or any finger marks. Important then to wrap well in plastic sheet to allow the clay to equalise in moisture content so that no crack forms between handle and mug.

11 July 2017

MAIOLICA TILES IN RUSKIN'S CAFE


I stopped for a bite to eat at Ruskin's Cafe in Museum Street, London, after a meeting at the Society of Designer Craftsmen and was pleased to see this maiolica tile panel behind the counter. I didn't ask where it comes from but it looks Italian, like the staff. Ruskin would have approved.

2 July 2017

A FRUIT CAGE OVER REDCURRANTS


The birds stripped the berries off my fruit bushes in past years, so this year I spent a day putting up a fruit cage. I don't remember the pigeons being so predatory - that's one of the changes we've seen in this garden, along with the decline in hedgehogs and butterflies and the arrival of parakeets, red kites and police helicopters. It worked: this season the redcurrants were plump and the pigeons were thin.